Pages

Friday, March 24, 2017

Digital Inspiration with Tya

Hi Lori Whitlock fans! It's Tya - and I am here on the blog today sharing with you some digital inspiration. I am so happy spring is finally here! It is one of my favorite times of year so I thought I would share with you a layout featuring the darling Celebrate Spring digital collection that Lori designed for Echo Park. It is such an adorable line and the papers and icons were perfect for this photo of my daughter giving me a little spring flower a few years back.

Products used:
-Celebrate Spring  Full Collection
-Marker Font

Thanks so much for stopping by today and don't forget to check out all of Lori's adorable digital designs over on Snap Click Supply!

Thursday, March 23, 2017

Carta Bella Rock A Bye Baby Girl Gift Set

Hi there Echo Park fans, it's Tya and I am up on the blog today to share with you my project featuring the absolutely adorable Rock A Bye Baby Girl Collection by Carta Bella. I decided to create a simple gift set for my cute new baby niece.
(insert Tya Smith RAB Blog photo here)

In my gift set I have included a monogram letter frame and a diaper bag shaped gift card holder. Let's start with the frame:
(insert Tya Smith RAB photo 1 here)
The frame is a 5x7 white frame with the glass taken out. I cut a piece of the 3x4 Journaling Cards paper on the stripe side for the back ground. I cut a lowercase letter "e" out of some pink textured cardstock with my Silhouette Cameo. I then used the Petite Bows Embossing Folder on the letter. I added the letter to the background paper using foam tape.
(insert Tya Smith RAB photo 2 here)
I then added one of the cute new Mini Paper Fans to the bottom corner. I love the dimension and texture this gives! I also added a small flower circle sticker from the sticker sheet to the bottom corner.
(Insert Tya Smith RAB photo 3 here)
I then used two tags from the Ephemera and a blue chipboard heart from the Decorative Tags to make the decor for the top portion. I tied a white ribbon and some pink twine into a bow and added this to the top of the letter with a piece of foam tape.
(insert Tya Smith RAB photo 4 here)
To finish off the frame I added a sentiment from the Frames and Tags Ephemera Pack, a safety pin sticker and a small pink heart from the new Enamel Shapes pack.
( insert Tya Smith RAB photo 5 here)
To make the cute diaper bag gift card holder I used a cut file from the SVG Cutting Files site called a Diaper Bag Treat Box. I cut the box with my Silhouette using the Precious Bundle paper.
(Insert Tya Smith RAB photo 6 here)
I added another one of the awesome Mini Paper fans to the front of the bag and also added another small pink enamel heart.
(Insert Tya Smith RAB photo 7 here)
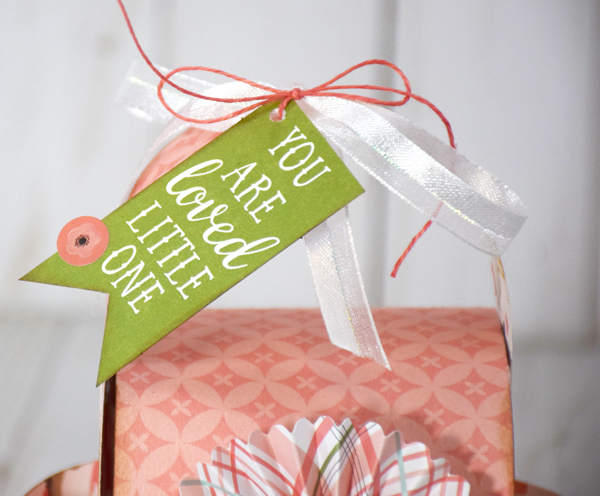
I added another tag from the Ephemera Pack and tied the tag to the bag handle with the same ribbon and twine as I used on the frame. I also added one more of the circle flower stickers to the tag.
(Insert Tya Smith RAB photo 8 here)
This cute bag is the perfect size to add a gift card to the inside.
(Insert Tya Smith RAB photo 9 here)
I hope I have inspired you to make a cute gift set like this one. I love thinking of fun, clever ways to give gift cards- the diaper bag was the perfect touch to my gift set! Thank you so much for stopping by the blog today! Happy Crafting everyone!

Products used:
-Rock A Bye Baby Girl 3x4 Journaling Cards
-Rock A Bye Baby Girl Precious Bundle
-Rock A Bye Baby Girl Frames and Tags Ephemera 
-Rock A Bye Baby Girl Sticker Sheet
-Rock A Bye Baby Girl Decorative Brads
-Rock A Bye Baby Girl Petite Bows Embossing Folder
-Rock A Bye Baby Girl Enamel Shapes
-Rock A Bye Baby Girl Mini Paper Fans
- Pink Textured Cardstock
-White sheer ribbon
-Pink twine
-Glue Dots
-Foam Tape
-Small Hole punch
- Diaper Bag Treat Bag SVG cut file ( from the SVG Cutting Files site)
-Silhouette Cameo
-Sizzix Big Shot Machine


Sunday, March 19, 2017

Echo Park Magic and Wonder Layout

Hello everyone! I am so excited to share a double page layout today because I get to highlight some of my very favorite photos. (of my very favorite people I might add...) using the amazing new Magic and Wonder line.


These pictures just make me so happy - the Magic and Wonder line really does make photos of "the Happiest Place on Earth" really shine. The colors and icons are so fun for recording a day at the House of Mouse. I used the Magic and Wonder Collection kit for my pattern papers.  Here are some close ups of my embellishments:

For this cluster I made a bold title by cutting out the Magic and Wonder label from one of the 4x6 cards in the collection kit. I added pop dots behind my title for some dimension. I also added a chipboard star from the Magic and Wonder Chipboard over the "I". Next I added the balloon bouquet and various other stickers from the Element Sticker sheet to decorate this corner. I cut the View-master from one of the tags in the Ephemera Tags and Frames pack. I cut out a few stars from some of the Solids Pack using my Silhouette Cameo and added that to the cluster as well. Then I added some Enamel Dots to finish it off.

For the next cluster I started off with a tag from the Ephemera pack and then added more die cut stars, a small yellow star sticker and the Best Day Ever is a tag from the Ephemera pack with a coordinating Chipboard piece added over the top. I finished this cluster off with some more Enamel Dots and some black and white Bakers Twine.

To make my title I made a mouse ear shape and cut it out with my Silhouette. I then added my journaling inside a circle and added pop dots to that section for dimension and added it to my ear die cut.


Over on the right hand page of the layout I added the Wish Upon a Star Tag as the base of my cluster. I then added a plaid tag from the Ephemera Tags pack, a letter M chipboard piece, a die cut star and an enamel dot and Bakers Twine. I also added a enamel camera from the Enamel Shapes pack. These are one of my favorite new products - so shiny and pretty!

The last cluster of embellishments are found on the bottom of the page. "The Whole Gang" piece is a tag from the Ephemera pack and I added some enamel banner shapes and a yellow chipboard arrow finish off this cluster.
I really had so much fun making this page. The Magic and Wonder collection is chock full of so many wonderful pieces. I can't wait to finish making more pages to complete my album for this special trip. Hopefully I have inspired you to pick up this darling collection for your own. Thanks for stopping by today! Happy crafting!

Products Used:
Magic and Wonder Collection Kit
Magic and Wonder Element Sticker
Magic and Wonder Solids Pack
Magic and Wonder Frames and Tags Ephemera
Magic and Wonder Chipboard
Magic and Wonder Enamel Dots
Magic and Wonder Enamel Shapes
Silhouette Cameo
Silhouette Shape #17222 Stars
Pop Dots, Foam Tape
Black and White Bakers Twine
Kraft Cardstock


Friday, March 10, 2017

Digital Inspiration with Tya

Hello Lori Whitlock fans - it's Tya and I am up on the blog today sharing with you a digital scrapbooking layout. I have always really liked all of Lori's Mod themed digital kits. Today I am sharing with you a layout featuring a few different kits from her Mod themes. These kits are bright and Springy and they have some really cute icons to play with too. Here is my layout:

I used the following products on my page:
- Mod Papers Kraft
- Mod Papers Multicolored
-Mod Seasons: Spring
-Mod Embellishments
-LW Life Templates Square Set 5
-LW Cutie Pie Font

Thanks for stopping by today! Happy Crafting!