Pages

Sunday, October 22, 2023

Matchbox Drawer Explosion Box ( Plus a little Surprise!) - - Doodlebug Design Sweet and Spooky DT project


Halloween is creeping up on us, and what better way to celebrate the spookiest season of the year than with a fun and creative paper craft project? If you’re a fan of Halloween and enjoy crafting, then I've got a fantastic project to share with you! 

So I have made a Halloween-themed explosion box with Doodlebug Design’s Sweet and Spooky collection, spiced up with the magic of Lori Whitlock’s Matchbox Drawer Explosion Box cut file. The fun part about this project is a little surprise in each of the boxes! I can't wait to share with you how easy it is to level up a simple matchbox drawer with the perfect touch for  Halloween! Let's jump right in!

Step 1: Gather Your Supplies

Before you begin, make sure you have all your supplies ready. The Sweet and Spooky collection from Doodlebug Design is a bewitching choice for your Halloween project, featuring lively, cute Halloween-themed patterns and embellishments. I chose pattern papers from the 12x12 paper pack and cardstock from the Textured Cardstock Assortment pack.  You will need some strong adhesive to make sure the box stays together like double-sided tape. You will need some of your favorite die cuts from the Odds and Ends, Chit Chat, and Bits and Pieces. I also used the This and That sticker sheet, the Puffy Stickers, the Sweet and Spooky shape sprinkles, and some little treats to fill the matchboxes.

Step 2: Download and Assemble the Cut File 

After choosing my papers I downloaded the cut file and then cut all the pieces out. The cut file can be found here. Matchbox Drawer Explosion Box. An assembly tutorial can be found here.

Step 3: Decorate the Inside of the Box:

    The cut file design from Lori Whitlock allows for numerous interior layers, and this is where I got to have fun with all the products! I added some tags to 2 of the boxes topped with an enamel dot.  On the other 2 layers, I added a pocket cut from cardstock to make little pockets to tuck a photo in. I added the scallop border sticker from the This and  That sticker sheet to the top of the pockets as well as a little sentiment sticker to the top of the photo spots.


In the center of the explosion box, I added the scalloped circle "The Sweet Life" sticker from the This and That sticker sheet. This is where the magic of the explosion box comes to life as the recipient opens the layers to reveal the surprises within.

Step 4: Decorate the Lid 

I wanted a fun topper for my lid so I turned to the Odds and Ends and picked one of the Haunted Houses, 3 trees, some Puffy Stickers, and a "Happy Halloween" banner from the Chit Chat. To make the layered look I simply die cut a 4-inch stitched circle from a metal die and then scored the circle at 1 3/4 " and 2 1/4 " to make a little valley with 2 half circles that fold up. I added a small piece of black cardstock and scored the 2 ends and glued them to the center of the circles to hold it together. I  layered the house, puffy stickers, and banner to the house and glued them to the front circle. I added the 3 trees and various stars and sparkles to the trees to the back circle. I did add a thin strip of some lightweight chipboard to the bottom of the folded-up circles for some added stability. Glue this to the center of the lid. 

Step 5:  Decorate the inside of the Matchbox Drawers- the little"surprise" I was telling you about!

I wanted to jazz up the inside of the drawers a little bit so I added some 2 1/2 x 3 1/2 inch pieces of the diagonal stripe side of the Tafffy Stripe paper. I then picked 4 of my favorite little monsters from the Odds and Ends, cut small strips of the Stardust Acetate, and folded the strip at the bottom about 1/4 inch. I glued this into the front of the drawer.   I then glued my little monster to the acetate. The fun part about doing this is when the recipient opens the little drawer- BOO! The little monster pops out for a fun surprise! 

 And there you have it – your own Halloween-themed explosion box masterpiece! The combination of Doodlebug Design’s Sweet and Spooky collection and Lori Whitlock’s Matchbox Drawer Explosion Box cut file creates a one-of-a-kind project that’s perfect for gifting or displaying your spooky memories. I had so much fun creating this and hope to have inspired you to try one of these super cute boxes for yourself! Have a faboolous Halloween and Happy Crafting! 


INSTAGRAM | YOUTUBE | BLOG


DOODLEBUG PRODUCTS USED:

Sweet and Spooky Collection

Sweet and Spooky Textured Cardstock

Sweet and Spooky Stardust 12 x12 Acetate


OTHER PRODUCTS USED:

Silhouette Cameo

Matchbox Drawer Explosion Box Cut File

4 inch Black Cardstock circle cut from a Stitched Circle Die

Small Black cardstock strip to hold the scored circle together

Lightweight chipboard to support the Haunted House scene on the lid

Candy to fill boxes

Saturday, October 21, 2023

13 Days of Halloween Treats Advent Calendar - Doodlebug Design Sweet and Spooky DT project

 Yay! It's finally Spooky Season! This is one of my absolute favorite times of the year and I have enjoyed so much being able to create with the new "Sweet and Spooky" collection to make some really fun Halloween-themed projects. Today I am sharing with you my latest creation- you've heard of the 12 Days of Christmas ... but what about the 13 Days of Halloween? Let me show you how we will be celebrating it here at the Smith house!

This cute little frame is an advent type of calendar, where each day, in the 13 days leading up to Halloween -  your little monsters can open the little treat boxes for a treat! Super fun! So I started with a basic black  12x12 picture frame, took the glass pane out, and added the Spooky  Sprinkles  12 x12 paper to the chipboard backing of the photo frame. I love the little dots on this paper! 

I added this title topper to the frame with some foam tape. I used  2 stickers from the This and That Sticker Sheet to make the title, and then added 2 large pink Sweet and Spooky Shaped Sprinkles to each side of the Halloween Sticker. I also added a scalloped orange and black border sticker from the This and That Sticker Sheet to the bottom edge of the frame as well.

To make each of my boxes I used various cardstock papers from the Sweet and Spooky Textured Cardstock papers and made 13 boxes. I found the cute box shape on my Pinterest board and followed the instructions found here to make the boxes and the added pattern paper from the 6x6 Paper Pad. To keep the boxes closed I added a clear Velcro Dot to the top flap of the bag. This made it nice and easy to get into the good stuff! 


And now the fun part! Decorating the boxes!!! I used lots of embellishments from the Sweet and Spooky collection to decorate the boxes.  I used the Odds and Ends,  Chit Chat, Bits and Pieces, Icon Sticker Sheet, Mini Puffy Stickers, Mini Icon Puffy Stickers,  and some Hocus Pocus Shaped Sprinkles. To make my numbers, I die cut (13) 3/4 inch stitched circles from a metal die and some white cardstock. I then used one of my new favorite products, the Alphabet Soup Puffy Stickers in Beetle Black. They were the perfect size for these mini little boxes! The black and white polka dot bows were from my stash. 
 
Here are just a few of the boxes. You can see all the fun layers of embellishments on each of the boxes! 


I  cannot wait to bring this out and watch the kids have fun seeing their little sweet surprises! I hope I have inspired you to create something fun ( hopefully candy will be involved - you absolutely cannot go wrong there!) this Halloween season using this faboolous Sweet and Spooky collection! Have the best day and thanks so much for stopping by!


DOODLEBUG PRODUCTS USED:

Sweet and Spooky Collection


OTHER PRODUCTS USED:

Black 12 x 12 frame

Velcro Dots

Black and White Polka Dot Bows

Candy and Small toys to fill boxes


Trick or Treat Wreath Layout - Doodlebug DT project - Sweet and Spooky Collection

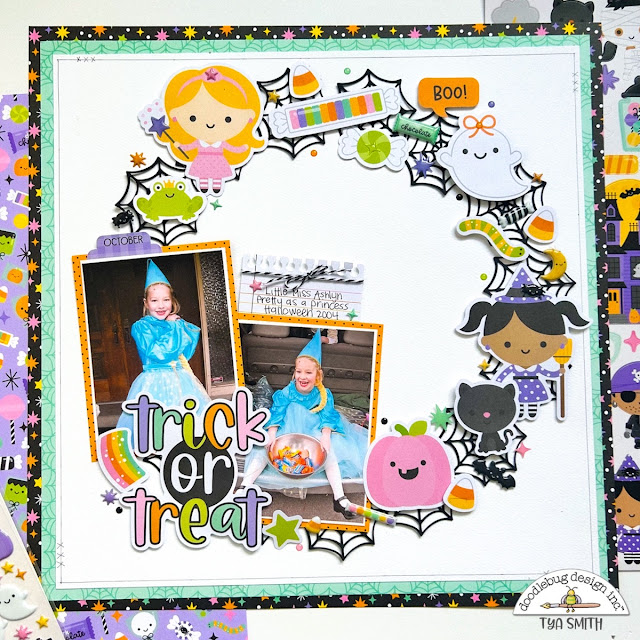
 Some of my fondest memories of Halloween were the ones spent choosing the perfect Halloween costume for the big night! And then to be able to parade around in that costume all night Trick or Treating was the greatest thing ever! Imagine how giddy I was when I saw all the costumed cuties in the new "Sweet and Spooky" collection! I knew I just had to add some to a layout! 


I love wreaths on layouts! They are a great base to add lots of embellishments and so I decided that I wanted a spiderweb wreath design for this layout. I used the Happy Haunting Spider Webs cut file and made my own out of some black cardstock on my Silhouette. I simply duplicated the spiderweb and then sized them all to about 2 inches. I arranged them into a wreath shape and then welded them together and came up with the fun spiderweb wreath.  I'll  link the cut file I used below:

My next steps were selecting my photos and a title. I used 2 3x4 photos and backed them with some of the Halloween Night dot paper. I grabbed one of the notebook paper journal spots from the Bits and Pieces and added my journaling along with a few sparkles from the Hocus Pocus Shape Sprinkles. This is also tied with some Beetle Black  Bakers Twine. I added the cute Trick or Treat Chit Chat die-cut title under the photos. Above the left photo, I added the cute "October" label which is on the This and That cardstock sticker sheet.


As we go around the wreath, you can see all the little bits and pieces that I added to the wreath die cut. I used lots of pieces from the Odds and Ends, Chit Chat, Puffy Stickers, and Hocus Pocus Shape Sprinkles. I used the Moonlight Magic and the Sweet and Spooky papers for my background. The pop of color on the Moonlight Magic paper was the perfect backdrop for all the colorful pieces in this collection! 

I adore all the different kinds of candies that are in this collection! It's so fun to mix and match all the die cuts with the Shaped Sprinkles and the Puffy Stickers. 


I really had the most fun designing this layout and see lots of future "wreath" type layouts being added to my albums. I hope I have inspired you to pull out a few "Sweet and Spooky" photos of your own and try a layout like this one! You will love- just like I did- getting to use lots of Doodlebug embellishments! Happy Crafting Friends! 


DOODLEBUG PRODUCT USED:
Sweet and Spooky Collection
Beetle Black Bakers Twine
Spider Web Cut File

OTHER PRODUCTS 
White cardstock
Black cardstock
Silhouette Cameo


Thursday, September 7, 2023

"Life is Beautiful - 4x4 Mini Album -Doodlebug Design DT project - Hello Again Collection

I have always loved making mini albums - although I don't design them very often as of late. When I saw the 'Hello Again" collection - I knew that I needed to pull out my mini album supplies again and get to work! This time I decided to make an album on the smaller side than I normally do, and I have to say - I think I have fallen in love with it! This album is made using a 4x4 inch binder and I had the MOST fun filling it up with more goodies from the "Hello Again" collection!


As you can see- I decorated the front with lots of pattern papers, die cuts, and Bling! On the side, I was able to use a bit of the Gold Dot Acetate and the Just Charming Clip to make a cute slip-in for the bookplate.  I also added the "Memories" sticker to the acetate.


Next the fun part! Decorating the inside! Many of the pages of my album were made by hand and then I glued them to a white paper tab cut file that I found that fit this size album. It made the pages so much easier to turn that way! And lots of Odds and Ends, and enamel shapes were used to decorate this first page! 
 
The album also came with a few page protectors. These were fun to use to make some fun interactive pages for my album. Isn't this happy sun from the "Hello Again" 3x4 card cut apart paper so cute? This flap lifts up to reveal more spots to add photos.

I was able to layer up my pages with many of the die cuts from the collection! I also was able to add a few of the fun Puffy Stickers in as well! I love those little guys! You can see a small peek of the envelope page I made on the right-hand side using my envelope-making tool to add another custom page to the album! The possibilities are endless! 


The 4x4-sized cards on the Patchwork Plaid cut-apart paper were the perfect size for an album like this as you can see on the left-hand side page. I also cut one of the tags from the Just Because paper and added it right to one of the rings of the album for some variety! 


Another flip-out page here opens up to reveal more space for photos. Isn't the rainbow on this card so fun! I layered one of the rainbows in the Odds and Ends right over the top of the rainbow already on the card with some foam tape for dimension! 

On the right-hand side of the page- you will see yet again another custom shape I added to the album. I just took a circle die cut that is cut in half and added it to my page tab. I then was able to add a photo mat that was hanging off the edge of the page for some fun variety. How lovely is that gold foil tag from the Bits and Pieces? It was the perfect size for this page! 


Here is the other side of that half-circle page. As you can see, a 2x2 size photo would be adorable in this spot! On the right side, I made a pocket card layered with one of the stickers from the This and That sticker sheet! I added a gold foil tab to one of the 4x4 cut-apart cards, and this piece pulls out from the pocket for more photo or journaling space! 


Here is the other side of the pocket card and the last page of the album. The florals in the collection just HAD to be the focal point of one of my pages! Why not end on this lovely spray of florals from the Bits and Pieces! 


A full video walkthrough of this album can be found here over on my YouTube channel! I had an absolute ball creating this little cutie and I hope I have inspired you to make a mini album of this size and fill it up with all of those "Life is Beautiful" memories and photos that you have! Thanks for stopping by today - Happy Crafting Friends! 


DOODLEBUG PRODUCTS USED
Hello Again collection
Hello Again 12x12 Textured Cardstock
Hello Again  Petite Prints 
Hello Again Gold Dot Acetate
Hello Again Just Charming Clip and Keychain

OTHER
4x4 D Ring Album


Monday, August 28, 2023

It has been so fun to get to be designing for Doodlebug again after my little hiatus. One of the things I love most is creating gift sets that I can use when I need them using my Doodlebug products and my trusty Silhouette Cameo!  A match made in heaven for sure! I have a fun bag and a cute fun-fold card to share with you today all made using the amazing 'Hello Again" collection!

Let's look at each of the pieces up close! This adorable bag caught my eye because I had an identical one back in the day! You know the kind- made of plastic - just like my awesome jelly shoes! I knew it would be such a fun design to use to hold fun little gifts for someone special. The bag is cut out using a piece of the Bubblegum Textured cardstock found in the Hello Again Textured Cardstock pack.  I used the Perforated Bag cut file (Design ID 446515) and cut it on my Silhouette. 

I added the "For You" tag from the "Just Because" tag paper. I tied it to the back with some Beetle Black Chunky Twine. I also added a few butterflies from the "All Aflutter" Shape Sprinkles to the tag for some shine with the beautiful gold foil on the butterflies.

This fun card was also cut out on my Silhouette. I am such a huge fan of fun fold cards and I fell in love with this fun one. It is the French Door Easel Card Birthday Balloons cut file ( Design ID 401737). I made the card base out of the Beetle Black Textured cardstock. I then added a few pieces cut out from the fun "Forever Flowers "paper. I omitted the birthday balloons on the cut file, and instead, added the "Thinking of You" cut-apart cards from the "Hello Again" paper. 


I  then layered the card up with the "Butterfly Bouquet" Doodlepop. This was such a great dimensional element to my card front that really makes a statement! 


The inside of the card needed some decorating, so I added a small strip of the  "Forever Flowers" paper and added the "Love You" circle die cut from the Chit Chat, along with the small yellow flower that was on the Doodlepop.


 I had so much fun creating this little gift set! I hope I have inspired you to make one of these to give to your special someone in your life! The 'Hello Again" collection has so many fun products that take your gift-giving packaging that little something extra that says just how much they mean to you! Thank you so much for stopping by today! Happy Crafting Friends! 


DOODLEBUG PRODUCTS USED
Hello Again collection
Hello Again 12x12 Textured Cardstock
Beetle Black Chunky Twine

OTHER
Silhouette Cameo


Sunday, August 13, 2023

Just Be You! - Hello Again - Doodlebug DT project

 Looking for a fun way to add lots of embellishments to your layouts? Try making a circle grid layout!

I am back today sharing another layout featuring the simply lovely "Hello Again" collection! I have mentioned before that Doodlebug really knows how to do embellishments right!! The array that is offered makes creating layouts so much fun because of the endless possibilities! You can mix and match all different types of embellishments! I am showcasing this design type here with my layout today


To create this layout I started with the Black Floral side of the Cute Calico paper. I then took an 11 3/4 x 11 3/4 inch piece of white cardstock and cut 9 circles out of the paper using my Silhouette. The circles measure 3.75 inches. 

Next, I selected 6 different pattern papers from the 6x6 paper pad and cut them to a little bit under 4x4 inches each. I then chose my 3 photos. I arranged my photos and pattern papers in the order I wanted to and then glued them to the background paper. I then added foam tape to the back of the white cardstock paper with all the circles cut out of it on top of the photos and pattern paper. 

And then the fun part- decorating each of the circles!

I loved the "Just Be You" cut out from the Chit Chat ephemera so that became my title. It fits perfectly with these fun pics of my daughter playing at the park.


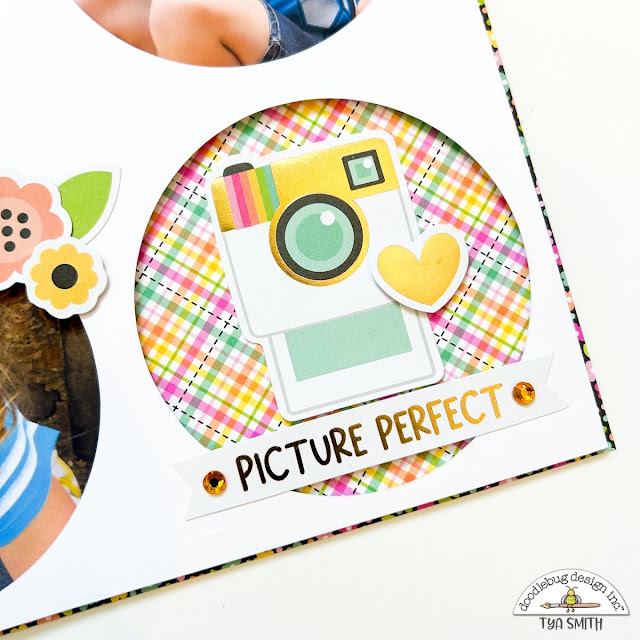
As you can see, I used lots of layers of different embellishments. I mostly stuck to the Odds and Ends for the bigger pieces and then added other pieces to accent. Here is a cute Polaroid-style camera with a fun sentiment from the Chit Chat. 


Here on the top circle,  I used a cute yellow check circle label from the Bits and Pieces. I added some foam tape behind 2 beautiful butterflies from the Odds and Ends. I also added a sprinkle of the stunning Mini Jewels for some sparkle and shine. 
The bottom circle features this cute hanger cut out from the Odds and Ends. I want one of these in real life! Too cute!


It wouldn't be a Doodlebug layout without a rainbow on there somewhere - so I added the rainbow, sun, and clouds to this circle.  All of these are from the Odds and Ends. Look how cute the little jewel sits on that cloud!  I also added a cute phrase sticker to my photo on the bottom circle. This time I used the This and That cardstock sticker sheet. 


And as a lover of all things floral - I had to add some flowers from the Bits and Pieces here and there on the layout. This cluster fits great at the bottom edge of one of my photos! 


Here's one more look at this fun page. I love how it all came together in the end! 


Thank you so much for stopping by today! I hope I have inspired you to give a circle grid layout a try! 
Happy Crafting friends! 


DOODLEBUG PRODUCTS USED
Hello Again collection

OTHER
Silhouette Cameo
White Cardstock