Pages

Friday, April 29, 2016

Doodlbug Design Under the Sea Collection - Penny Slider Cards

Hello everyone-  I am  up on the blog today sharing my Under the Sea project for Doodlebug Design. I just adore this line- the mermaids are the absolute cutest and the little sea creatures are so fun!

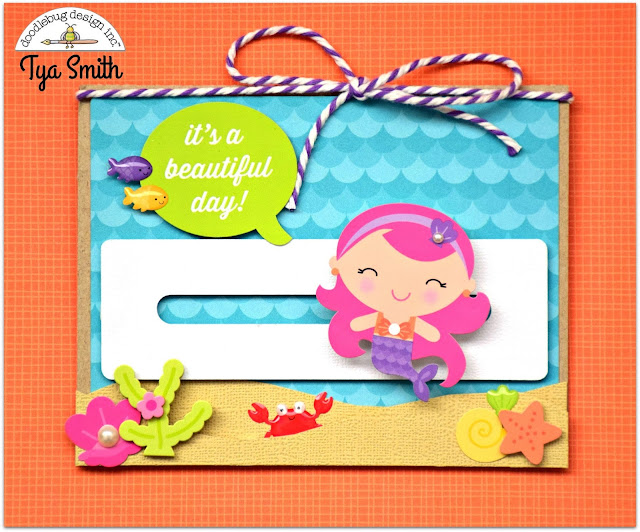
 For my project I decided to do these really fun Penny Slider cards that I made using my Silhouette Cameo. I have always wanted to try these and they were really easy to put together! If you haven't seen these before, they use 2 pennies as a sliding mechanism that makes whatever icon you put on the mechanism slide and turn. It's really a fun technique that I thought would be fun with the sea creatures to make it look like they are swimming :)

 The files I used can be found here:
A2 Lori Whitlock Penny Slider Card
Lori Whitlock Circle Penny Slider Card
And here is a YouTube Tutorial on how to put them together:
Slider Cards

A couple of tips on putting these together -
I used small round mounting circles to hold the pennies together. If you use square ones the shapes wont be able to spin.
Because I used stickers from the Icon Sticker sheet, I don't want them to stay sticky, otherwise they may stick to the card and not slide and spin well. So first I add my pop dot - Leave the back paper on the pop dot. Then I sprinkle a little baby powder on the back of the sticker and brush the excess off with a small paintbrush.You can then take the adhesive off the pop dot and add it to the card.
Here are the cards:

The first one features this darling mermaid swimming along the ocean floor. The sentiment is from the This and That sticker sheet and I tied some Lilac Chunky Twine to the top of the card to finish it off.


To make the ocean floor, I fussy cut some light tan cardstock and layered them along the bottom adding some pop dots in between for dimension. I then added some stickers from the Icon Sticker Sheet, some Sweet Seashells Mini Doodlepops, and some Under the Sea Shape Sprinkles to make the scene. 

Next up is the Circle card. I just loved the cute little turtle so much! She takes center stage on this card. I used the same products as above to make this card.

Aren't these so fun? I can see these as a birthday card or baby shower card. Kids will just love the interactive feature of these cards. Hopefully I have inspired you to try a couple out! Thanks for stopping by today! Happy Crafting!


Monday, April 18, 2016

3D Letter and Ornate Gatefold Card

Hi everyone - it's Tya and I am so happy to share with you all a few of my favorite new cut files from Lori Whitlock. With Mother's Day (and my Mom's Birthday) around the corner - I thought I would get a jump start on my gift giving with this fun set.
These files were just what I was looking for. I used the Petticoats line that Lori designed for Echo Park. I love the floral, feminine feel to this line. And aren't the colors lovely? Let me give you a closer look:

First up is this beautiful card. I used the 5x7 Ornate Gatefold Card (Silhouette) (LW SVG). I love how I was able to use one of the 4x6 cards found in the Petticoat papers for the perfect sentiment. I used some stickers from the collection as well as some jewels and washi tape to decorate the card.

 I have been so looking forward to using one of Lori's new 3D Letters. They are so slick to put together!! Only 2 tabs on the top and bottom are all you need. I used the letter "L" (Silhouette) (LW SVG)  for my mom's name - Leisa. She can place this on her desk at work. I also added one of Lori's new 3D Flowers (Silhouette) (LW SVG)  to decorate it. She always does the most beautiful job on these flowers. So realistic looking!


Thanks for stopping by the blog today. I hope I have inspired you to pick up these fun new files and give these projects a try. Happy Crafting!


Saturday, April 16, 2016

Doodlebug Design Anchors Aweigh Collection : Nursery Decor

Hi there friends - I am up on  the blog today with  my Anchors Aweigh projects for Doodlebug. I made some really fun baby Nursery decor. This line ALMOST made me baby hungry again! My baby boy is almost 6 feet tall and 16 years old - so this will have to go to one of my cute nephews instead :) Anyway- I loved this line with all of the adorable sea creatures and the nautical theme. I knew I wanted to make this plaque and door hanger to highlight some of my favorite pieces of  the line. Here's what I did:


To make the plaque I found a really cute board and some wood squares at my local craft store. The wood squares are about 5 1/4 x 5 1/4. I used the 6x6 pad to cover the wood squares .I glued the wood squares to the board. I cut some white cardstock letters out with my Silhouette and glued them on the paper. I then used the Icon Stickers, This and That stickers, Minnows Doodlepops, Shape Sprinkles, Matte Sprinkles, Bubble Sprinkles, and Chunky Twine. So many fun elements! Here are some close ups:


The other piece I made was a door hanger. I loved the 4x4 square pattern papers and this No Wake Zone paper was perfect. I cut the door hanger from some kraft cardstock on my Silhouette. I added lots of the same embellishments as the plaque. I thought this turned out so fun! Here are some close ups:

Thanks for stopping by today - Hopefully if you have a little sailor in your life, I have inspired you to create these fun decor pieces. Happy Crafting!