Pages

Friday, September 7, 2012

Cupcake Throne Tutorial

Hey all-
I have had several requests for the instructions on how make my Cupcake Throne that I did in my Scor Pal class at Heartland so here it is! This was such a fun little project to do and I love that it only takes one sheet of 8 1/2 x 11 paper! So here we go!


Cupcake Throne:
5 ¼ x 11 brown cardstock
3 ¼ x 11 brown cardstock
2 ½ inch circle punch
3x 4 ¼ green cardstock
Stripe pattern paper 3x2 (Hello Cupcake Imaginisce)
3 green cardstock strips
- (2) 3/4x 3 ¾ for sides.
- (1) 3/4x3 for front
3 strips stripe paper
-(2) 1/2x 3 ¾ for sides
-(1) ½ x 3 for front
Ribbon
Sticker from Imaginisce


Step 1- Place 5 ¼ x 11 paper on Scor Pal on 11 inch side. Score paper at 1, 5, 6 and 10 inches

Step 2- Turn and place paper on Scor Pal on 5 ¼ inch side. Score at 1 inch and 4 ¼ inch 

Step 3- Snip edges in middle and snip away top and bottom corners.


Step 4- Fold in edges on top section and use a 2 ½ inch circle punch to punch a hole in this section. It is ok that the 2 side flaps get punched as they will tuck into the center of the box and not be seen.                              


  Step 5- Adhere edges in. Make sure the circle punch section is on the top.


Step 6-Take 3 ¼ x 11 piece and lay the 11 inch side on the ScorPal. Score at 5 ½ inches.


Step 7- Glue this section to back of bottom box. I like to overlap the different edges of the two boxes for a cleaner look.


Step 8- Embellish with ribbon, pattern paper and stickers. Glue small cardstock and stripe paper strips along front and sides of base. Add your favorite cupcake and enjoy!
Thanks for joining me! Stay tuned for some sneak previews on the projects that I will be doing at my Halloween ScorPal class in October! Thanks again!


Tuesday, July 31, 2012

A Big thanks and a Big Winner

First off I wanted to thank you all so much for the kind words and encouragement that you sent my way after my segment aired on My Craft Channel. It is always nervewracking for me to put myself out there, especially when you are on the same channel as greats like Teresa Collins and Heidi Swapp, so thank you for all of the positive comments :)
Now on to the big winner!
Susan - would you please email me your information and I will get the Scor-pal sent out to you ASAP! Congrats and thanks for all of the entries!
Happy Crafting!

Thursday, July 26, 2012

Scor-iffic Ideas on My Craft Channel


Hey all!
Some exciting news!  I was so fortunate to be asked to share my love of all things scoring tool related on My Craft Channel with my awesome friend Lori Allred on her Inspired by Pinterest Show. It is always so fun to do these little spots with her! Love My Craft Channel! If you haven't been by there- go check their site out. Amazing ideas everyday and some shopping bargains as well!

Check out the show here: My Craft Channel Score-iffic Ideas!

I decided to do some birthday related projects using Imaginisce's darling Hello Cupcake birthday line for my supplies. But as I stated in the video these projects can be versatile enough to use any paper line and any theme. I am also teaching 4 of these projects in a class at Heartland Paper. If you are in the area I would love to see you in class!
Check out the blog for more information: Heartland Paper Scor Pal Class with Tya
Here is what we are going to be doing in class:
4 projects

Invitation with envelope and pull out invitation

Darling party hat using the Scor-Pal to add some fun dimension

How fun is this Cupcake Holder?

This is the little treat bag that I demonstrated on air. Just remember that this little bag doesn't have to be used for just birthday treats! It can be used to hold all types of cute little gifts - again love the versatility of the boxes and bags you can make using the Scor-Pal!  Here are the directions and dimensions used on the segment so you can make one of your own!

Happy Day Treat Bag:

- red cardstock cut 3 x 11 inches
- red cardstock cut to 3 1/2 x 4 1/2 inches
-scor tape or other strong adhesive
-hole punch
-ribbon or tuelle
-2 pieces of Imaginisce Party Time paper cut to 2 3/4 x 4 inches
-Imaginisce Oh Happy Day Chipboard Sticker Stackers

Directions:

1- For the outside cover of the box take the 3 x 11 inch paper and place it on your scoring board. Place the 11 inch side on the top of the Scor-Pal.  Make sure left edge is all the way over to the left side to insure proper measurements. Scor at 4 3/4 inches and 6 1/4 inches.

2-For the inside of the box take the 3 1/2 x 4 1/2 inch paper and place it on the scoring board. Place the 4 1/2 inch side on the top of the Scor-Pal. Score 1 inch all the way around all 4 sides of the paper. 
3-Snip the 4 corners up to the 2 center lines of the box.
4- Add adhesive to the 4 corners and then glue those sections into the inside of the box. Glue the middle box to the middle section of the outside cover.


Add the dot paper to the front and back of the bag. Punch two holes in the top of the bag and add the ribbon and tie in a bow. Add sticker to front. Add treat and enjoy!
Now for the best part! Would you like to win a Scor-Pal tool of your very own? Who wouldn't right after seeing all the awesome projects you can create! I am giving away a full size Scor Pal tool to one very lucky winner. Please leave a comment on my blog here and we will do a drawing to win! Stay tuned to see who it is!

Thanks for stopping by!

Thursday, July 12, 2012

Echo Park Banner

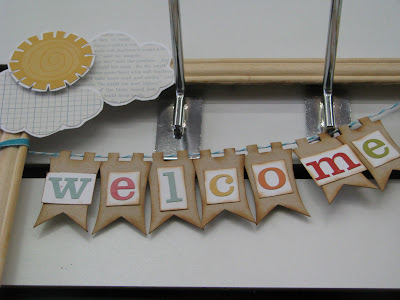
Just wanted to check in- summer here at the Smith house is bustling full of boating, soccer tournaments, baseball games and swimming parties! But just wanted to share this fun little banner/wreath I made for Heartland using Echo Park's new Hello Summer line which is one of my favorite new lines:

I took these photos at the store. It is hanging above the cash wrap and anyone who buys anything at the store will hopefully see :)
This is kind of a combination of a couple of different projects I have been wanting to create. I am loving non traditional shaped wreaths and I had seen so many wreaths floating around Pinterest using picture frames as a base and loved the shape. I just got this light wooden frame from the dollar store (yay! Cheap craft) and then all the others were supplies from Heartland. Chipboard banner from Petersen Arne and then papers and embellishments from Echo Park.

Love these cute banners cut with my Cameo. They have a little flap on the ends that you can glue down that makes it easy 


Close up of frame details

Love the font on these sticker letters

Added some pop dots for dimension on the Sun.

Love this pleating technique! Had to try it out! SO EASY!

Thanks for stopping by!
PS- Stay tuned to for your chance to win your very own Scor-Pal. I will be giving one away in the next couple of weeks in conjuction with my Scor-Pal class and a fun Scor-iffic spot I did with My Craft Channel.

See ya!

Friday, May 4, 2012

Whats Up Crafty Friends?

Hey all-

Well, its now May and the poor old bloggety blog has been neglected for far too long. Just wanted to take a quick minute to update some fun new additions to my crafty resume :)


My dear friend Lori Allred is like the best person EVER to know if you are a crafty chick like me. That girl knows EVERYONE! She has hooked me up with some amazing opportunities as of late and I am so grateful to her and her trust in me to step up and do things that are so out of my comfort zone :) I am now calling her my friend/booking agent! Check out her amazing blog and even better this awesome site that I adore where she has the COOOOOLEST Pinterest show.


So Lori asked me to do a segment for Northridge Media for their "Make it Your Own" Challenge and I happily obliged since I love the publications that Northridge puts out . I kind of have an obsession for idea books and knew this would be something that would be super fun to do. I went down to the My Craft Channel studios to film my little segment. Now some of you may know this is not my first run at television/online crafting. I did a few Good Things Utah segments for Imaginisce last year and while that was so much fun, taping this segment for My Crafty Channel was so much more laid back. If I screwed up a word , they could stop and re edit the shot for me. Live TV with Good Things Utah was soooo much more nerve wracking since it was live TV. I think I will stick with this type of filming from now on. I got to me the wonderful and super sweet Kristine McKay and she was so easy to work with and put me at east right away. It was such a great experience and. I hope to go back one day! Here is the show: Give it a look-see!


I dont have a clue why they put this hideous shot of me up for the freeze frame but hey - at least my hair looked ok :)

Love the project I did. I used some photos that I took of Ashlyn and her bestie Emma (who just happens to be Lori"s daughter) and decided to do a simple craft using embroidery hoops as a frame. I had seen these type of projects popping up all over Pinterest but they used fabric, Those of you who know me know my adversion to any thing fabric, or sewing so I thought, hey maybe I can used my ginormous hoard of pattern paper and use that instead of fabric inside my embroidery hoop. And with some simple cutting and a little bit of Mod Podge - I made these cute frames for Ashlyn to hang in her room. Here are some shots of the hoops up close:


I used lots and lots of yummy My Minds Eye Miss Caroline Line. Love, Love, Love the pretty pastels in this line!

Loved pulling out all of my circle punches to make these flowers

More circle punches

Loved these cute journaling cards. I had the girls each list their favorite things about each other. What fun it will be to look back years from now and see what your BFF loved about you.


Next , I got a call from Lori asking me if I would like the opportunity to work with this amazing lady:


I KNOW RIGHT???!!!! I get the chance to design with her on her Teresa Collins Stampmaker Design Team. If you haven't yet seen the stampmaker in action - it is sooo cool! Check it out here:


 I am not really a stamper, but after seeing what this little tool could do - I was converted really fast. I will get the chance to work closely with her designing projects for her to showcase on line and at trade shows. This is such an exciting new opportunity for me. I got the chance to meet Teresa in person and she is just as nice and wonderful as everyone says she is. I am truly blessed beyone words to get this gig! Stay tuned for ideas and projects highlighting everything this tool can do.


(they spelled my name wrong - just realizing that... oh well )

Well that about sums it up for now. Stay tuned for more Stampmaker Ideas and more fun project ideas around the corner...


Take care-