Pages

Monday, October 30, 2023

What's Cookin' Envelope Recipe Mini Album - Simple Stories DT project


 Hey there crafty friends! I just wanted to hop on here and share with you a little walkthrough/tutorial on how I put my pages together to create this fun little Recipe Mini Album. I used the super cute What's Cookin' collection from Simple Stories. My assignment over at Simple Stories is cards - which I LOVE! But sometimes I like to think outside of the box on some creative ways my card-making skills can turn into other types of projects.

I decided I wanted to create a mini album made from envelopes and the Card Kit from the What's Cookin' collection. As a card maker, I have OODLES of envelopes so I looked up a few YouTube videos and Pinterest ideas and came up with this little cutie! It was super fun to put together - and I want to share with you how I did it! 


So let's start with our supplies- You will need the following:

 (6) #10 Kraft Business Envelopes. I got mine on Amazon here
(2) 4 1/2 x 6 1/4 pieces of medium-weight chipboard for front and back covers
(1) 12x 12 piece of What's Cookin' Seconds Please paper
1 set  of What's Cookin' Recipe cards
(5) 4 x 6-inch pieces of Color Vibe cardstock in the following colors:
Robins Egg, Peony, Mustard, Tomato, and Peacock
(2) 4-inch white doilies
Twine, Ribbon, and Brad to decorate the cover

For your tools you will need:
-Paper Trimmer
-Scoring Board 
-Bone Folder
-Adhesive (liquid or strong double-sided tape works best)
1 1/8 -inch circle punch
Optional - Ink for edges and a Scallop Edge Corner Chomper

Step 1- Seal up all the flaps on the envelopes


 Step 2- Trim 1/4 -inch off each end of the envelope. It should measure 9 1/4 inches.


Step 3- Lay the 9 1/4 inch side on your scor-board and score at 3 1/4 inches.

Do all these 3 steps to each of the 6 envelopes

Step 4- To start  - take 2 of the envelopes and lay them like the picture shown below. You are going to be gluing the short flap of one envelope to the back long flap of the other envelope.

Make sure that you add your glue about 1/8 to 1/4 of an inch away from the folded edge of the envelope. This will just make the pages turn easier once the album is all put together.


Step 5- Do this to all of the envelopes so when you are done it lines up like the photo below. Take your circle punch and add the notches to the top edges of the envelopes so the recipe cards can be pulled out easier.


Step 6 - Make your front and back covers. Take the 12x12 piece of Seconds Please paper and trim it to the following sizes:
(2) 5 1/2 x 7 1/4 inches. This is the Yellow Gingham side of the paper that will be used for the front and the back sides of the album. Add a strong glue to the chipboard and center in the middle of these papers. Miter corners and add strong adhesive to glue these papers to the chipboard.

(2) 4 1/2 x 6 1/4 inches. These papers are glued to the fronts of the chipboard inside the front cover and back cover of the album. I used the brown floral side of the Seconds Please paper. NOTE: if you are going to add a ribbon closure for your album, glue it to the top of the brown floral side of the paper in the back cover BEFORE you add the envelopes to the album! 


 Your covers will look like this when done. 


Step 7- Glue your covers to the front and back of your folded envelopes.

Step 8- Let me show you how to add the flaps that go into the large flap of the envelope. Take your 4x6 inch pieces of Color Vibe cardstocks and lay the 6-inch side on the top of your scor-board. Score the paper at 3 1/2 inches.


If desired notch the top corners with a corner chomper to round the edges. I used the Scallop side of my corner chomper to achieve a little bit of a decorative edge.


Fold your paper and place the scored edge at the top of the envelope. Tuck the excess into the short flap pocket and glue the paper to the envelope. 


Here is a little photo example of how the pages are put together in the album. The next part is where I took the pieces of the card kit and added them to my album. I didn't really measure these out - I just trimmed the papers to fit the space on the envelopes. 


I added 2 recipe cards to each pocket of the album. One in the front flap and one inside the pocket covered by the Color Vibe cardstock.


Step 9 - Decorate your pages and your Front Cover using elements from the What's Cookin' Card Kit. 


I hope this little album inspires you to create one of these for that special someone whom you would like to share cherished recipes with - or even keep it for yourself and add your favorite recipes! Either way- this is such a fun collection to work with to remember all of those special memories in the kitchen, Please feel free to reach out to me if you have any questions on this project! 
Thank you so much for stopping by !
Happy Crafting! 


Sunday, October 22, 2023

Matchbox Drawer Explosion Box ( Plus a little Surprise!) - - Doodlebug Design Sweet and Spooky DT project


Halloween is creeping up on us, and what better way to celebrate the spookiest season of the year than with a fun and creative paper craft project? If you’re a fan of Halloween and enjoy crafting, then I've got a fantastic project to share with you! 

So I have made a Halloween-themed explosion box with Doodlebug Design’s Sweet and Spooky collection, spiced up with the magic of Lori Whitlock’s Matchbox Drawer Explosion Box cut file. The fun part about this project is a little surprise in each of the boxes! I can't wait to share with you how easy it is to level up a simple matchbox drawer with the perfect touch for  Halloween! Let's jump right in!

Step 1: Gather Your Supplies

Before you begin, make sure you have all your supplies ready. The Sweet and Spooky collection from Doodlebug Design is a bewitching choice for your Halloween project, featuring lively, cute Halloween-themed patterns and embellishments. I chose pattern papers from the 12x12 paper pack and cardstock from the Textured Cardstock Assortment pack.  You will need some strong adhesive to make sure the box stays together like double-sided tape. You will need some of your favorite die cuts from the Odds and Ends, Chit Chat, and Bits and Pieces. I also used the This and That sticker sheet, the Puffy Stickers, the Sweet and Spooky shape sprinkles, and some little treats to fill the matchboxes.

Step 2: Download and Assemble the Cut File 

After choosing my papers I downloaded the cut file and then cut all the pieces out. The cut file can be found here. Matchbox Drawer Explosion Box. An assembly tutorial can be found here.

Step 3: Decorate the Inside of the Box:

    The cut file design from Lori Whitlock allows for numerous interior layers, and this is where I got to have fun with all the products! I added some tags to 2 of the boxes topped with an enamel dot.  On the other 2 layers, I added a pocket cut from cardstock to make little pockets to tuck a photo in. I added the scallop border sticker from the This and  That sticker sheet to the top of the pockets as well as a little sentiment sticker to the top of the photo spots.


In the center of the explosion box, I added the scalloped circle "The Sweet Life" sticker from the This and That sticker sheet. This is where the magic of the explosion box comes to life as the recipient opens the layers to reveal the surprises within.

Step 4: Decorate the Lid 

I wanted a fun topper for my lid so I turned to the Odds and Ends and picked one of the Haunted Houses, 3 trees, some Puffy Stickers, and a "Happy Halloween" banner from the Chit Chat. To make the layered look I simply die cut a 4-inch stitched circle from a metal die and then scored the circle at 1 3/4 " and 2 1/4 " to make a little valley with 2 half circles that fold up. I added a small piece of black cardstock and scored the 2 ends and glued them to the center of the circles to hold it together. I  layered the house, puffy stickers, and banner to the house and glued them to the front circle. I added the 3 trees and various stars and sparkles to the trees to the back circle. I did add a thin strip of some lightweight chipboard to the bottom of the folded-up circles for some added stability. Glue this to the center of the lid. 

Step 5:  Decorate the inside of the Matchbox Drawers- the little"surprise" I was telling you about!

I wanted to jazz up the inside of the drawers a little bit so I added some 2 1/2 x 3 1/2 inch pieces of the diagonal stripe side of the Tafffy Stripe paper. I then picked 4 of my favorite little monsters from the Odds and Ends, cut small strips of the Stardust Acetate, and folded the strip at the bottom about 1/4 inch. I glued this into the front of the drawer.   I then glued my little monster to the acetate. The fun part about doing this is when the recipient opens the little drawer- BOO! The little monster pops out for a fun surprise! 

 And there you have it – your own Halloween-themed explosion box masterpiece! The combination of Doodlebug Design’s Sweet and Spooky collection and Lori Whitlock’s Matchbox Drawer Explosion Box cut file creates a one-of-a-kind project that’s perfect for gifting or displaying your spooky memories. I had so much fun creating this and hope to have inspired you to try one of these super cute boxes for yourself! Have a faboolous Halloween and Happy Crafting! 


INSTAGRAM | YOUTUBE | BLOG


DOODLEBUG PRODUCTS USED:

Sweet and Spooky Collection

Sweet and Spooky Textured Cardstock

Sweet and Spooky Stardust 12 x12 Acetate


OTHER PRODUCTS USED:

Silhouette Cameo

Matchbox Drawer Explosion Box Cut File

4 inch Black Cardstock circle cut from a Stitched Circle Die

Small Black cardstock strip to hold the scored circle together

Lightweight chipboard to support the Haunted House scene on the lid

Candy to fill boxes

Saturday, October 21, 2023

13 Days of Halloween Treats Advent Calendar - Doodlebug Design Sweet and Spooky DT project

 Yay! It's finally Spooky Season! This is one of my absolute favorite times of the year and I have enjoyed so much being able to create with the new "Sweet and Spooky" collection to make some really fun Halloween-themed projects. Today I am sharing with you my latest creation- you've heard of the 12 Days of Christmas ... but what about the 13 Days of Halloween? Let me show you how we will be celebrating it here at the Smith house!

This cute little frame is an advent type of calendar, where each day, in the 13 days leading up to Halloween -  your little monsters can open the little treat boxes for a treat! Super fun! So I started with a basic black  12x12 picture frame, took the glass pane out, and added the Spooky  Sprinkles  12 x12 paper to the chipboard backing of the photo frame. I love the little dots on this paper! 

I added this title topper to the frame with some foam tape. I used  2 stickers from the This and That Sticker Sheet to make the title, and then added 2 large pink Sweet and Spooky Shaped Sprinkles to each side of the Halloween Sticker. I also added a scalloped orange and black border sticker from the This and That Sticker Sheet to the bottom edge of the frame as well.

To make each of my boxes I used various cardstock papers from the Sweet and Spooky Textured Cardstock papers and made 13 boxes. I found the cute box shape on my Pinterest board and followed the instructions found here to make the boxes and the added pattern paper from the 6x6 Paper Pad. To keep the boxes closed I added a clear Velcro Dot to the top flap of the bag. This made it nice and easy to get into the good stuff! 


And now the fun part! Decorating the boxes!!! I used lots of embellishments from the Sweet and Spooky collection to decorate the boxes.  I used the Odds and Ends,  Chit Chat, Bits and Pieces, Icon Sticker Sheet, Mini Puffy Stickers, Mini Icon Puffy Stickers,  and some Hocus Pocus Shaped Sprinkles. To make my numbers, I die cut (13) 3/4 inch stitched circles from a metal die and some white cardstock. I then used one of my new favorite products, the Alphabet Soup Puffy Stickers in Beetle Black. They were the perfect size for these mini little boxes! The black and white polka dot bows were from my stash. 
 
Here are just a few of the boxes. You can see all the fun layers of embellishments on each of the boxes! 


I  cannot wait to bring this out and watch the kids have fun seeing their little sweet surprises! I hope I have inspired you to create something fun ( hopefully candy will be involved - you absolutely cannot go wrong there!) this Halloween season using this faboolous Sweet and Spooky collection! Have the best day and thanks so much for stopping by!


DOODLEBUG PRODUCTS USED:

Sweet and Spooky Collection


OTHER PRODUCTS USED:

Black 12 x 12 frame

Velcro Dots

Black and White Polka Dot Bows

Candy and Small toys to fill boxes


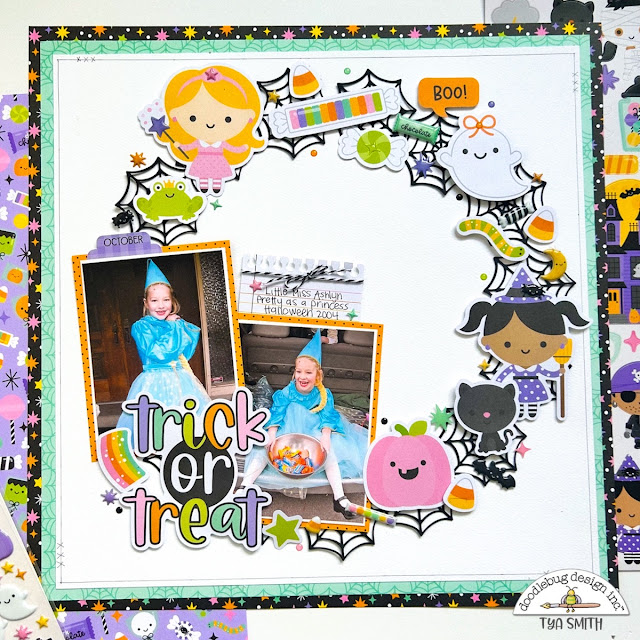
Trick or Treat Wreath Layout - Doodlebug DT project - Sweet and Spooky Collection

 Some of my fondest memories of Halloween were the ones spent choosing the perfect Halloween costume for the big night! And then to be able to parade around in that costume all night Trick or Treating was the greatest thing ever! Imagine how giddy I was when I saw all the costumed cuties in the new "Sweet and Spooky" collection! I knew I just had to add some to a layout! 


I love wreaths on layouts! They are a great base to add lots of embellishments and so I decided that I wanted a spiderweb wreath design for this layout. I used the Happy Haunting Spider Webs cut file and made my own out of some black cardstock on my Silhouette. I simply duplicated the spiderweb and then sized them all to about 2 inches. I arranged them into a wreath shape and then welded them together and came up with the fun spiderweb wreath.  I'll  link the cut file I used below:

My next steps were selecting my photos and a title. I used 2 3x4 photos and backed them with some of the Halloween Night dot paper. I grabbed one of the notebook paper journal spots from the Bits and Pieces and added my journaling along with a few sparkles from the Hocus Pocus Shape Sprinkles. This is also tied with some Beetle Black  Bakers Twine. I added the cute Trick or Treat Chit Chat die-cut title under the photos. Above the left photo, I added the cute "October" label which is on the This and That cardstock sticker sheet.


As we go around the wreath, you can see all the little bits and pieces that I added to the wreath die cut. I used lots of pieces from the Odds and Ends, Chit Chat, Puffy Stickers, and Hocus Pocus Shape Sprinkles. I used the Moonlight Magic and the Sweet and Spooky papers for my background. The pop of color on the Moonlight Magic paper was the perfect backdrop for all the colorful pieces in this collection! 

I adore all the different kinds of candies that are in this collection! It's so fun to mix and match all the die cuts with the Shaped Sprinkles and the Puffy Stickers. 


I really had the most fun designing this layout and see lots of future "wreath" type layouts being added to my albums. I hope I have inspired you to pull out a few "Sweet and Spooky" photos of your own and try a layout like this one! You will love- just like I did- getting to use lots of Doodlebug embellishments! Happy Crafting Friends! 


DOODLEBUG PRODUCT USED:
Sweet and Spooky Collection
Beetle Black Bakers Twine
Spider Web Cut File

OTHER PRODUCTS 
White cardstock
Black cardstock
Silhouette Cameo