Pages

Thursday, October 15, 2015

Faux Chipboard Letters - Lori Whitlock Creative Team project

Hi there everyone - its Tya and I am here up on the blog today to share a neat technique with you. So I have a confession to make- I am a FONT JUNKIE! I love fonts and have oodles on my computer and I am always looking for fun and creative ways to spruce up my fonts. Lori has some of my favorite fonts and comes out with new ones all the time. So if you are a font junkie like me - this tutorial is for you!

So I wanted to share with you a great way to turn your favorite fonts in to faux chipboard letters. I love chipboard letters too - so this way, with the help of my Silhouette, I can turn my favorite fonts into chipboard looking letters! Let me show you how I did it!

First off, select a font. I am using  the  adorable LW Cirque Font for my project.  It can be found here on the Silhouette Store and here on the LW Shop. You can decide on the thickness of the letters you want. I wanted mine pretty thick so I cut out 9 letters.
                                

 After all the letters are cut out , simply glue all the letters together in a stack. Here you can see the difference and see the dimension when all the letters are glued together. The stack in the picture isn't glued together yet, just wanted to show you the thickness-Didn't want you all to think I glued them all so crooked! :)
To add a little fun to the letters to make them look a little more realistic - I brushed a thin coat of Glossy Accents on to the top letter. The fun thing about this technique is you can also make the letters any size you'd like, something that you can't do with premade chipboard letters. My letters are about 2 inches wide and 3 inches tall.


 I made this really fun and simple Halloween frame to add to my home holiday decor. I got the frame from the dollar store and along with the letters,  just added some banner cut outs and some stickers and embellishments to dress is up. So it's an inexpensive project too!

I hope that I have inspired you to make some of these fun "chipboard" letters with your favorite fonts too! It's a great way to add dimension to your projects. Thanks for stopping by!

Files I used:


Tuesday, October 13, 2015

Lori Whitlock Creative Team October Blog Hop


Hi friends - welcome to Lori Whitlock's October Blog Hop! You should have arrived here from Cathy's blog or you can start at the very beginning at Lori's blog where you can pick up this darling freebie and she is also doing a giveaway so make sure to stop back there!
So for my project today I got into the Halloween holiday spirit and decided to do a couple of my favorite treat boxes and bags. It was so hard to choose just a couple because there are so many darling ones to choose from but I decided on a cellophane bag insert and a tomb box that holds some ghost Peeps.
 So on the cellophane bag insert, I decided to use it on the outside of the bag instead of the inside. I added some sticky strip to the bottom and the inside back cover to hold a bag of treats inside it. I love mixing and using my cut files in different ways. Plus I loved the festive little bat on the bag and he was easier to see with the bag made this way. Add some cute stickers to the tag and you have a quick and easy treat bag just perfect for holding all that yummy candy!
One of my favorite holiday treats has always been Peeps, so imagine how happy I was when they made cute little ghostie ones for Halloween! I placed the ghosts in a cellophane bag and tied it of with some twine. I added more stickers and a sentiment to the tomb front and I loved how it turned out! 
Here are the files that I used :
- Cellophane Halloween Bag Insert - (Silhouette Store)
-3 Treat Bags (LW Shop)
-Tombstone Treat Box (Silhouette Store) (LW Shop)
Papers and Stickers are from Doodlebug Design October 31st Collection

Hopefully I have inspired you to check out all of the fun treat holders that Lori has to offer. Treats are always more fun to get when they come in a cute package don't you think? 

Made sure you check out Lori's promotions she has going on with this month's blog hop - she always has such great sales- don't forget to check them out!
 Next stop is Ashley's cute blog - make sure to stop by and see what she is up to this month!


And there is a giveaway also this month so don't forget to enter that as well! Thanks everyone!

a Rafflecopter giveaway

Wednesday, September 30, 2015

Doodlebug Design October 31st Collection - Duo Pocket Treat Holder Tutorial

Hi there Doodlebug fans - I am here up on my blog today to share with you my October 31st Collection project. Can I just say - I LOVE Halloween! It really is one of my favorite holidays! One of the best things of course is being allowed to eat lots and lots of candy! So today I am sharing with you a little tutorial on how to make a cute little bag with 2 pockets you can fill up with treats! 

These little guys are so quick and easy to make and take no glue - its just a little scoring and folding! These would be great for classroom treats or Halloween party favors! Let me show you really quick how I did these -
1- Take an 8x8 inch piece of paper. Lay it on your scoring board and score right down the middle at  the 6    inch mark. Then score at 5 1/2 and 6 1/2.
2- Rotate your square a quarter turn to the next 2 points. Score at 4 and at 8.
3- Fold the 2 sides in. They will overlap.
4-Fold the paper over on the center score mark - the pockets will be on the inside.
5-Now fold the top flap up on the top score mark.
6- Fold the other side on the other score mark.
7 - This is what the pocket will look like once you have folded on all the score marks.
8 - Punch a hole in the top.

So easy and so fun right?
Here are few of the ones that I made. I used lots of pattern papers from the October 31st collection. I also used some stickers from the Icon Sticker sheet and some glitter sprinkles. For the tags I used a 1 1/2 inch scallop punch and a 1 1/4 inch circle punch .I used some Happy Halloween Doodles for the tags. The bag is topped off with some cute ribbon and the brand new Doodlebug Chunky Twine!

Hopefully I have inspired you to make a few of these for your special little trick or treaters! Candy always tastes better when it comes in a cute package right? Happy crafting everyone!

Monday, September 28, 2015

LorI Whitlock Creative Team - The Story of Fall Banner


Hello Lori Whitlock friends! It's Tya here up on the blog today. To officially welcome Fall to our home, I decided that a cute banner was just what my mantle needed! So I decided to use the adorable Story of Fall line to make this fun and festive project. Let me show you what I did!
So I found a banner base that I liked and cut 4 of them out on my Silhouette. The file I used didn't have 2 holes punched in it to string the twine through , so I just made a couple and placed them on the top two corners of the base. I then covered the bases with a few fun pattern papers from the Story of Fall Collection.
I then cut out 4 ovals and used my Silhouette Sketch Pens to draw an orange border on the ovals. Then I used the darling LW Homemade font and cut out the letters F A L L out of brown cardstock and added them to the top of the cream ovals. I then cut out a few leaves. 
 If you notice on the leaves, there is a pattern embossed on them. I was able to get my hands on the new Silhouette Curio machine and had a great time using the embossing tool with the Curio to get the patterns on the leaves. I found some really beautiful shimmery specialty paper that took the embossing wonderfully!
I added some chipboard elements from the Story of Fall collection to the banner shapes.

I also added some buttons and twine to the leaves for some added texture.
 That's all there is too it! I had alot of fun with this project and hopefully have inspired you to make this fun banner to get the fall season underway in your home too! Happy Crafting!

Files used:
-6 Banner Shape ( I added 2 holes instead of one) (Silhouette Store)
-Build a Banner (LW Shop)
-Fall Leaves ( LW Shop) (Silhouette Store)
-LW Homemade Font (LW Shop) (Silhouette Store)

Monday, September 14, 2015

Doodlebug Design Fall Friends Collection - Gift Set

Hello Doodlebug friends - today I am here to share with you my project using the adorable new Fall Friends line. It is such a fun and festive line and after creating this project I am SOO ready for fall to be here!

 So the first true sign of fall to me is when all the fall scented products start coming out. I stopped by my local Bath and Body Works and picked up a few fall scented soaps and decided to give some away to my cute sister in law who just bought a new house.


I wanted to put the soaps in a cute little carrier so I hunted a file down to use with my Silhouette Cameo that would work. I found this 3D Two Handled Drink Carrier and the soaps fit perfectly. I followed the instructions on this blog Bits of Paper by designer Jamie Lane. It was so quick and easy and I love how it turned out.
 Here are a few close ups:
 I used some Doodlebug Textured cardstock for the box base, a sheet of pattern paper for the front and I cut out one of the 4x4 squares from another one of the papers and added this to the box front. I added a cute little bunny, a pumpkin , leaf and an acorn sticker from the icon sticker sheets for some added fun. I mounted the Fall title on a piece of orange cardstock. I also added a  red scallop sticker border from the Fancy Frills sheet along the top and bottom of the box front.
Using some green cardstock, I cut two little tags and then added a few other stickers and glitter sprinkles to the tags. I tied the tags to the soaps with some twine for a little rustic feel. 
So that's all there is too it! I love giving gifts and when I use my Doodlebug products I know that my recipient can't help but love them! Hopefully I have inspired you to create a fun fall gift for a special someone in your life. Happy crafting! 

Thursday, September 10, 2015

Lori Whitlock Creative Team Tutorial - Changing a file to fit the Season

Hi everyone - today I am here to share with you a simple tutorial on how to utilize your cut files to fit any season!


 Some of the files that I have downloaded come with specific accents that fit a certain occasion.  For instance I bought these 2 files to use for some Valentines Day projects I had in mind back in February - but with a simple switch of the accents - you can use files that are supposed to be used for a certain holiday any time of the year.
 
Let me show you how I did these-
First the tall gable box-
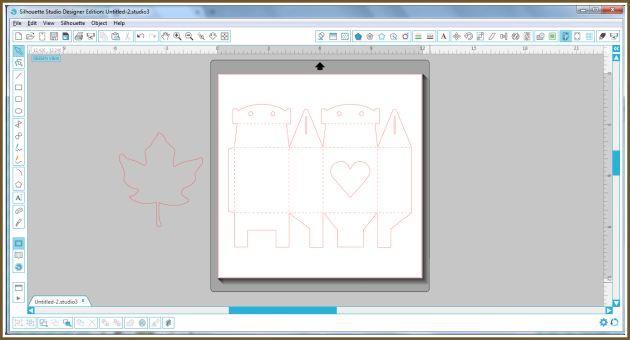
I opened up the box and found a leaf shape that I liked that I wanted to substitute.
 I ungrouped the file and separated the heart from the box. I resized the leaf to be about the same size as the heart. I then placed the leaf in the center of the box and then grouped the box and the leaf shape all together.
 Here is the box with the leaf shape in the center instead of the heart. Just right for a little box of fall treats to give to a friend.

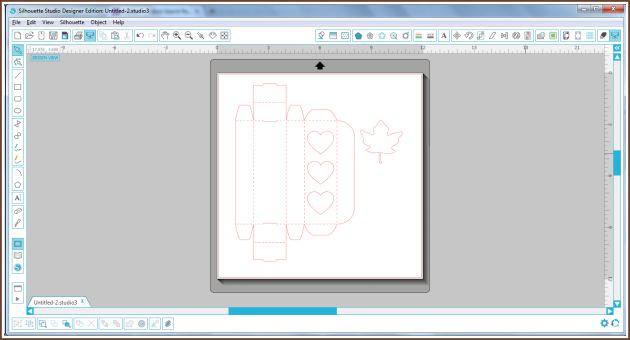
The steps are the same with this cute box. The original box had 3 hearts on the lid. I used the same leaf shape.
 Ungroup the hearts from the box, resize the leaf to be the same size as the hearts
 Add the leaf shapes to the box and then group the leaf shapes to the box. Cut out as normal.
Here are the files that I used to make these projects:
 -Tall Heart Gable Box (LW Shop) (Silhouette)
-No Glue Box Hearts (LW Shop) (Silhouette)
-3 Fall Leaf Set (LW Shop) (Silhouette)

That's all there is to it! I hope that I have inspired you to stretch your cut files to fit any occasion. The Silhouette machine makes it so easy to customize your cut files. One of the reasons I love my Silhouette so much - I can make it fit to whatever I want to design with a few simple modifications. Thanks for stopping by! Happy Crafting!


Tuesday, September 8, 2015

Lori Whitlock Creative Team September Blog Hop


Hi friends - welcome to Lori Whitlock's September Blog Hop! You should have arrived here from Cathy's blog or you can start at the very beginning at Lori's blog where you can pick up this darling freebie and she is also doing a giveaway so make sure to stop back there!
 So for my project today I thought I would get a jump start on some fall projects and I was super inspired and so excited to use the new The Story of Fall line that Lori designed for Echo Park. It is PERFECT for any fall themed project! I just love it! So I decided that I would do a little card and gift set.  Here is what I did:

I was so happy when I found these little scented candles in yummy fall scents ( the one in the example was called Mulled Cider - delicious!) These will be so fun to give to a co-worker or teacher or a fall loving friend :) They were quick and easy to throw together which I always love. 


My favorite sticker on the sticker sheet with The Story of Fall line is this darling mason jar Fall sticker. I had to highlight it on one of Lori's awesome pop out cards. I love me a fun fold card and this one was just what I was looking for to highlight the sticker. 


Here are the files that I used this month to create my project:
-3D Wooden Crate Box (LW Shop) (Silhouette)
-7 Labels 2 (LW Shop) 
-7 Christmas Gift Tags (Silhouette)
-Autumn Leaf Box (leaf and scallop circle on tag) (LW Shop) (Silhouette)
- A2 Pop Out Card Rounded (LW Shop) (Silhouette)

 
Thanks for stopping by and seeing what I created this month. I hope I have inspired you to get a jump start on your fall crafting!
Made sure you check out Lori's promotions she has going on with this month's blog hop - she always has such great sales- don't forget to check them out!
 Next stop is Chrissy's cute blog - make sure to stop by and see what she is up to this month!

And there is a giveaway also this month so don't forget to enter that as well! 


a Rafflecopter giveaway