Pages

Friday, June 29, 2018

Pack Your Bags Gift Card Box | Carta Bella DT project

Hello everyone! It's Tya up on the blog today and I love, love, LOVE making 3D project! I love making boxes and bags and this fun gift card holder that is shaped like a suitcase was the perfect way to use the awesome Pack Your Bags line from Carta Bella.

To make this box, I used my Silhouette and used this cut file : Suitcase 3D Box Gift Card with Tag
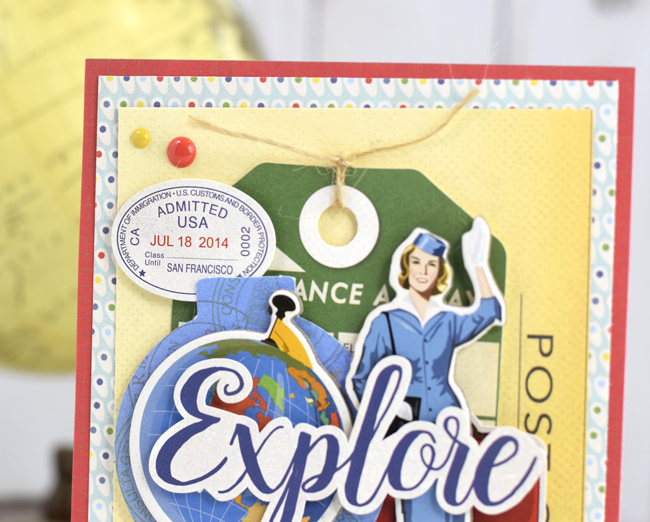
I used some kraft cardstock, a few pattern papers, stickers and ephemera to  make this box. Here are some close ups of the box:

 This is the inside of the pull out box. It is made for a gift card holder or you could insert some cash there as well.
 I decorated the outside by layering some stickers  and ephemera. I tied a tag to the handle of the suitcase with some kraft twine. I loved that Traveler sticker the corner. And aren't the colors of this  collection so vibrant and fun?
Here is how the box pull out drawer works. This suitcase is such a fun way to give your favorite traveler a little fun money to spend on their trip. I can't wait to give this away to a friend who is leaving on a dream trip soon. Everyone needs a little fun money on vacation right?

Thank you for stopping  by the blog today. I hope this project inspired you to use the Pack Your Bags collection to create a fun box of your own. Happy Crafting!

Products Used:
-Carta Bella Kraft Cardstock
-Pack Your Bags Away We Go paper
-Pack Your Bags Open Road paper
-Pack Your Bags Sticker Sheet
-Pack Your Bags Frames and Tags Ephemera
-Decorative Brads
-Silhouette Cut File - Suitcase 3D Box Gift Card with Tag (shape #77321)
-Silhouette Cameo
-Kraft Twine
-Foam Tape, Scor Tape, Glue pen
-Gift Card

Pack Your Bags Card | Carta Bella DT project


Hi Echo Park fans, Tya here with a fun card featuring the amazing Pack Your Bags collection by Carta Bella. Oh boy, did I fall head over heels in love with this collection. I had such a fun time with it! Maybe it's because I love to travel and this collection reminded me of all the fun trips we have taken.

I made this fun card with a few stickers, ephemera, some 6x6 paper , enamel dots and a die cuts.  It was fun to make this shadow box type of card using the Rounded Square Nesting dies. I love the layers I was able to make.
Here are a few close ups of the card:


Thank you so much for stopping by today - I hope that my card has inspired you to pick up this collection and play with it and create some fun travel themed projects of your own.  Happy Crafting!

Products Used:
-Rounded Square Nesting Die Set
-Pack Your Bags 6x6 paper pad
-Pack Your Bags Sticker Sheet
-Pack Your Bags Frames and Tags Ephemera
-Pack Your Bags Escape Word Die Set
-Carta Bella Ultra White Felt Cardstock
-Enamel Dots
-White Crochet Thread
-Foam Tape

Summer Splash Gift Bag - Carta Bella


Hi there everyone! I'm up on the blog today sharing with you a sweet little gift bag that I made using the wonderful Summer Splash collection! I just want to go swimming at a beach or a pool now after playing with this fun set! 
This gift bag would be a really fun gift bag or favor bag for a pool party, someone leaving on a beach vacation would love this or for a party favor. The options are endless with this cute theme!

To make my bag I used a bag die cut and cut it out on my Silhouette. I loved the little palm trees on the Flamingo Fun paper so that is what I chose for my bag. To decorate the bag I used a pink doily to build a scene on.I cut out a circle using the Stitched Circle die cut from the Seaside paper from the 6x6 paper pad.  I layered some stickers from the Element Sticker sheet, and some chipboard accents from the Chipboard Phrases sheet. I added a few enamel dots from the Summer Splash Enamel Dots for some shine.
To finish off the bag I added a double bow to one of the handles from some lovely pink ribbon and a yellow button with  some white crochet thread in the center. I love the pops of pink in this collection.
I'm so glad you stopped by the blog today! I hope I have inspired you to whip up a few of these fun bags for your next Summer Splash Bash! Happy Crafting! 

SUPPLIES:
Silhouette Electronic Die Cutting Machine
Pink Ribbon
Pink Doily
Yellow Button
White Crochet Thread
Foam tape and dots

A Dogs Tail - Echo Park

Hello everyone! Up on the blog today, I am sharing a handmade card featuring the awesome "A Dog's Tail" collection. Being a dog lover, I had such a fun time playing with all of the fun papers and icons in this collection - it is all too cute!

To make my card, I started with a 5x5 inch cardstock base made from some Ultra White Felt Cardstock.  I then grabbed a red and green dot pattern paper from the 6x6 paper pad. I also cut a strip of Tan paper from the Coordinating Solids set and layed it across the middle of the cards.  I tied a piece of white crochet thread on one end and tied a knot in the end.  I then used a few die cuts from the Ephemera pack and layered them on the front of the card with some foam tape. I then added a few stickers from the Element sticker sheet .
Here are a few close ups of the card:

 I added a few banner pieces to the top edge of of the card and tucked them under the striped die cut.
This was such a fun little card to make and I can't wait to give it  to one of my many dog loving friends. This would cheer anybody up! Thank you for stopping by today! Happy Crafting!


 Products used:
-Ultra White Felt Cardstock
-A Dog's Tail 6x6 Paper Pad
-A Dog's Tail Element Sticker Sheet
-A Dog's Tail Ephemera 
-A Dog's Tail Navy/Tan Coordinating Solid
-Foam Tape
-White Crochet Thread


Gone Camping Layout - Carta Bella

Hello there! I'm up on my blog today sharing a layout featuring the amazing "Gone Camping" collection - what a fun collection this is! I love the art in all of these papers and icons!
 We love to camp in our family so this collection was perfect for scrapbooking some of my favorite photos of us camping in our favorite spot up in the mountains. I started with some kraft cardstock . I added a few water color paint splatters on the backgroud for some interest and then played with a few of the pattern papers in the collection. I love adding  little embellisment and  die cut clusters on my layouts. Here are a few close ups of the clusters:


I added a few strips of journaling along the bottom of the layout:
I had so much fun creating this layout! If you have any sort of outdoorsy type of photos - hiking, fishing or camping- this collection is for you! I hope I have inspired you to make a few layouts of your own using this adorable collection! Thank you for stopping by today! Happy Crafting!

Products used:
-Gone Camping Gearing Up
-Gone Camping Border Strips
-Gone Camping Happy Campers
-Gone Camping Fly Fishing
-Gone Camping Sticker Sheet
-Gone Camping Ephemera
-Kraft Cardstock
-White Cardstock for journaling
-Watercolor Paint
-Foam Tape

Wednesday, June 27, 2018

Back to School Card | Echo Park

Hi there! It's Tya up on the blog today sharing a fun handmade card featuring the awesome "Back to School" collection. I loved working with this fun collection especially because I really love all the fun back to school supplies that come out lol! The collection is filled with fun school themed papers and icons that made making this card super fun.
I thought it would be fun to turn one of the 3x4 cards into a flash card. I simply rounded the corners  on the addition 3x4 card and  made a fun pocket element to tuck the cards into. I added another 3x4 card and tucked it behind the flash card.
 I really liked these banners - they looked  great up in this corner surrounded by some enamel dots.
 On the bottom of the card I added a cluster of die cuts and stickers to  make a little scene. I  added  a piece of  black twine around the pocket as well.
Thank you for stopping by the blog today and taking a peek at this fun card. I hope I have inspired you to  pick up this amazing collection and make some fun cards to give to your favorite student or teacher.  They will love it! Happy Crafting!

Products used:
-Black enamel dots
-Black Twine
-Foam Tape and Dots

Saturday, June 9, 2018

Passport Card - Carta Bella paper


Hello everyone!I am sharing a card I made using the awesome Passport line by Carta Bella! Boy does this collection make me want to pack a bag a go somewhere fun! I loved the icons in this line! Here are a few close ups of the card:

I always like to check out what is on the 4x6 cards to use for possible card backgrounds - I loved the postcard card and so I trimmed it down and placed it on my card front. It's always fun to use the journaling cards for things other than journaling and the 4x6 size is perfect for cards. And isn't that flight attendant awesome!  I  loved the "explore" sticker sentiment as well, so it is front and center on my card.

I layered some of the pieces on a stack of suitcases sticker. I made a border from one of the border strip papers in the 6x6 paper pad. I really liked the pop of black along the bottom edge.
Thank you for stopping by the blog today. I encourage you to check out this amazing collection! The Passport collection will fit all of your travel picture memory keeping needs! I can't wait to use this collection again! Happy Crafting!

Products used:
-Passport 6x6 Paper Pad
-Passport 4x6 Journaling Cards
-Passport Element Stickers
-Passport Ephemera
-Passport Chipboard Accents
-Passport Enamel Dots
Foam tape
Twine
4 1/4 x 5 1/2 cardstock (for card base)

Mermaid Tales Gift Bags - Echo Park

Hello !I am up on the blog today sharing with you some cute and easy gift bags featuring the lovely Mermaid Tales Collection.

To make my bags, I started with some glassine bags that are approximately 5x7 inches. I used a piece of Mermaid Paradise as a belly band and glued to the center of the bag. I then chose a few of my favorite 3x4 cards and stickers created a few little scenes for the front of the bags. I die cut a few scallop circles from our Stitched Scallop Nesting Dies and tucked them here and there on the cards. I also die cut a 3D bow from the Mini 3D Bow die from some of the Magical Mermaids paper. I glued the bows to a mini white clothespin and  then added a white button and some pink twine. I sprinkled a few iridescent gems on the cards as well.  Here are a few close ups:

These fun little bags would be perfect to add a small gift or gift card. They would also make great Mermaid party favors as well. This collection was SOO much fun to work with - there are so many fun elements to this collection. I hope I have inspired you to pick this one up today! Happy Crafting!

Products used:
-Mermaid Tales 4x4 Journaling Cards
-Mermaid Tales 3x4 Journaling Cards
-Mermaid Tales Magical Mermaids
-Mermaid Tales Mermaid Paradise
-Mermaid Tales Element Sticker
-Stitched Scallop Nesting  Die Set
-Mini 3D Bow Die Set
-Glassine Bags
-Gems
-Mini White Clothespins
-White button
-Pink twine
-Foam tape